Texture Reference Samples
Texture analysis based on experimental pole figures registered by the X-ray diffraction techniques both by the transmission method (Decker, Asp and Harker, 1948, J.Appl. Phys., 19, 388 ) and by the back-reflection one (Schulz, 1949, J.Appl. Phys., 20, 1033) needs appropriately prepared input data.

Due to defocusing effects, background of diffraction signal (non-coherent scattering), changeable penetration depth (statistics of counts), etc., a suitable correction of experimental data should be assured. Such a refined data set in the form of the experimental, corrected and normalized pole figure(s) is a basis of texture analysis. Applying the suitable calculating procedures enable to obtain the orientation distribution function (ODF) and then the complete pole figures or the inverse ones. Verification of the experimental conditions of measurement and correction of the rough texture data should be done on the basis of data collected on the reference samples for analysis of crystallographic texture.
Thanks to the reference samples, the imperfections in the geometrical arrangement of texture goniometer, correctness of beam optics set-up, and regularity of detection of diffraction effects can be verified. Each of the kit texture standards contains following reference samples for analysis of crystallographic texture:
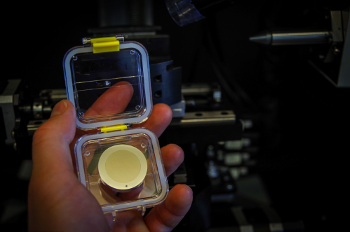
Each of the set of texture standards has own unique serial number and hermetic container. The name of standard samples is "LS".
Samples are in form of metal disks of 27 mm in diameter and of ca. 6 mm in thickness. The reference samples have a circles form of 20 mm in diameter. Each of the samples is surrounded by an outside metal ring with a suitable colour marker (dots) placed on its co-sample surface. The markers indicate the Longitudinal Direction which together with the Transverse Direction and Normal one determines the sample framework (LD, TD, ND) established as it is shown in Table below (table contains also others details by way of example for the austenitic stainless steel standards):
| Schematic view with ascribed framework (LD, TD, ND) | Type of marker | Description of Figures | Related Filenames (LaboTex format)* | Crystallographic Lattice | Sample Symmetry |
|---|---|---|---|---|---|

|
one dot | Austenite-powder | Austenite-powd_.epf Austenite-powd.epf Austenite-powd_.pow Austenite-powd.pow | cubic | arbitrarily chosen |

|
two dots | Austenite-ort | Austenite-ort_.epf Austenite-ort.epf | cubic | orthorhombic |

|
three dots | Austenite-tri | Austenite-tri_.epf Austenite-tri.epf | cubic | triclinic |
- *) FileName_ - denotes experimental data corresponding to intensity of diffraction peak (by PIM).
- *) FileName - denotes experimental data corresponding to integrated intensity of peak profile (by IM).
- *) FileName - in LS kits is defined in manual
In the case of the powdered reference sample, because of lack of any planar anisotropy, the LD direction can be chosen arbitrarily during measurement and data processing procedures. Marker on powdered samples indicates direction of mounting in goniometer analogically as LD direction for massive samples.
The measurable areas of the reference samples (top sample surface) are homogeneous from the texture viewpoint and have been prepared for registration of the diffraction effects in the backreflection mode by the Schulz method. Because of the measurement technique of the backreflection pole figures (tilting the sample and its rotation around the normal direction), recommended beam size (the largest dimension of its cross section) should not exceeds the values given in table:
| Range of pole figure (alpha angle) | Recommended beam size [mm] |
|---|---|
| 0 ÷ 75° | 5.1 |
| 0 ÷ 80° | 3.4 |
| 0 ÷ 85° | 1.7 |
If the largest beam size will be applied, the additional diffraction effects coming from the external metal ring of the reference sample can be registered. To eliminate the undesirable effects, a suitable numerical procedure or a shaded mask should be applied. A global crystallographic texture of the reference samples are analyzed by the Accredited Testing Laboratory in the field of texture analysis. The laboratory meets requirements of the European Norm EN ISO/IEC 17025. For initial data processing a DAMfit (Bonarski, 1999) computer program has been used. The DAMfit package enables to process the rough experimental data collected in a pseudo Position-Sensitive Detection (pPSD) mode of the diffraction effect (Bonarski et al., 2000). The pPSD consists in registering the intensity of the diffracted beam in the chosen angular range, using a scanning Theta-2Theta or Omega-2Theta mode. As a result of such process a diffraction profile is obtained. Then, the optimal curve of a theoretical distribution according to: Gauss, Lorenz (Couchy), Modified Lorentz or Marlos & Thomas is fitted to each of the profile, and the integrated intensity is a value of the experimental pole figure in a determined point. This procedure eliminates also the effect of presence of other phases. Such integrating method (IM) (see the LaboTex manual Pole Figure: Plot and Registration Conventions) was applied in texture measurements. Independently of the integrated intensity, the peak intensity can be applied to estimate the measured pole figure too. The way, termed here as a peak intensity method (PIM) represent the registration mode by means of a "point" counter. It should be noticed that the IM is more precise texture measurement technique then the PIM one. Finally, the DAMfit program prepares input data for the LaboTex computer package. Applying both the integrating method of registration and correcion by means of the random (texture free) sample assures obtaining a reliable "device-independent" pole figures for quantitative texture analysis. The delivered reference samples and the attached results allow evaluating the correctness of the procedure of texture analysis applied in your laboratory. The measurement details, files with data and results of the texture analysis are on the CD and in the brochure.
The package with Reference Samples includes the following:

- Standard samples (in triclinic sample symmetry and orthorhombic sample symmetry, in containers);
- Serial Number of Standard (in manual);
- "Random" (powder) sample in container;
- Manual - brochure;
- Pole figures plots (in manual);
- ODF plots (in manual);
- Inverse pole figures plots (in manual, on demand);
- Files containing experimental pole figures, in EPF format (on CD);
- Data for defocussing correction: files containing "random" (powder) pole figures files in POW data format (on CD);
- Report from Testing Laboratory (in manual);
- Name of Testing Laboratory which made measurements (Laboratory meets requirements of the European Norm EN ISO/IEC 17025) (contact person e-mail, in manual);
- Recommended storage conditions & warranty (in manual);
- Quality of powder samples (texture free): Texture Index below 1.1 (Texture Index = 1.0 for perfect texture free sample);
- Container (minicase);
- Additional plots or files (on demand);
- Special LaboTex version (limited) for analysis of standards (on demand).
- by a fine-grain diamond paste, do not try to make any other treatment of the samples.
- Use the reference samples for the X-ray examination only.
Recommended storage conditions:
The reference samples for texture analysis of crystallographic texture have been designed and prepared to give years of stabile materials structure and safe usage in the industrial and research laboratories. As with all materials standards, however, there are a few basic precautions that should be taken to avoid damage:
- Read the documentation carefully and save it for future reference.
- Keep the reference samples into the delivered metal box when the measurements are not performed.
- Keep in dry at stable temperature, protect it before direct heat/cool sources, such as radiators/refrigerator, and avoid mechanical shocks.
- Do not insert additional things into the sample box.
- Do not touch the measurable surface of the samples.
- Apart from the routine maintenance, like careful wiping the sample surface by the enclosed cloth disk or clean it using alcohol - if necessary - delicate polishing by a fine-grain diamond paste, do not try to make any other treatment of the samples.
- Use the reference samples for the X-ray examination only.
The Types of the Reference Samples
reference samples for analysis of crystallographic texture| Material/Type | Description |
|---|---|
| Al Aluminium | samples: triclinic sample symmetry, orthorhombic sample symmetry, "random" |
| Ti Titanium (alpha,hcp) | samples: triclinic sample symmetry, monoclinic/orthorhombic sample symmetry, "random" |
| Steel (ferritic, bcc) | samples: triclinic sample symmetry, orthorhombic sample symmetry, "random" |
| Steel (austenitic, fcc) | samples: triclinic sample symmetry, orthorhombic sample symmetry, "random" |
| Cu (alloy) | samples: triclinic sample symmetry, orthorhombic sample symmetry, "random" |
| All Standards | samples: triclinic sample symmetry, orthorhombic sample symmetry, "random" |
| Texture "Free" Samples and Special Samples | |
| "Random" samples (A) | texture free samples: Aluminium, Titanium, Ferritic Steel |
| "Random" samples (B) | texture free samples: Aluminium, Austenitic steel, Ferritic Steel |
| "Random" samples (C) | texture free samples: Austenitic steel, Ferritic Steel, Cu-Al |
| "Random" samples (D) | texture free samples: Austenitic steel, Ferritic Steel, Titanium |
| "Random" samples (ALL) | texture free samples: Austenitic Steel, Ferritic Steel, Titanium, Cu-Al, Al |
| Special Cu (SCU) | samples (Copper): "random" + two samples with different volume fraction of <110>fiber component |
red - texturized with orthorhombic sample symmetry (after defocusing correction),
blue - powder sample ("random" - texture free) sample (after defocusing correction).
Example: Section of pole figures for azimuthal angle=0.0: Aluminium samples.
Image made by LaboTex.
- Standard samples (suitcase with samples in hermetic containers);
- Manual - brochure;
- Serial Number of Standard (in manual).
- Report from Testing Laboratory (in manual);
- Name of Testing Laboratory which made measurements (Laboratory meets requirements of the European Norm EN ISO/IEC 17025) (contact person e-mail, in manual);
- Recommended storage conditions & warranty (in manual);
Bibliography
- Bonarski J.T.; (1999) Computer programms: DAMfit
- Bonarski J.T., Wróbel M. and Pawlik K.; (2000). Quantitative phase analysis of duplex stainless steel using incomplete pole figures, Materials Science and Technology Vol. 16 No 6, p. 657-662.
- Decker B.F., Asp E.T. and Harker D.; (1948). J.Appl. Phys., 19, 388.
- Pawlik K., Ozga P.; (1999). LaboTex: The Texture Analysis Software, Göttinger Arbeiten zur Geologie und Paläontologie, SB4.
- LaboTex. (1997-2004). The Texture Analysis Software, by LaboSoft s.c.
- Schulz L.G.; (1949). J.Appl. Phys., 20, 1033.
The package with Reference Samples
- Texture Reference Samples
- Experimental
- Types of the Textures
- Content of the package
- Recommended Storage Conditions
